In this article, we will explore how to export to Excel using Python. This will greatly help us to automate repetitive tasks especially in data processing. We'll examine three methods along with their corresponding libraries, and finally, we'll make comparisons between them.
- TableToExcel
- Pandas
- Openpyxl
To prepare our project in ArcGIS Pro, we will start a new notebook. To start a new notebook, I select the 'import' tab and choose 'new notebook. For the example, we will use paths for the entire world. We can look at the roads on the map.

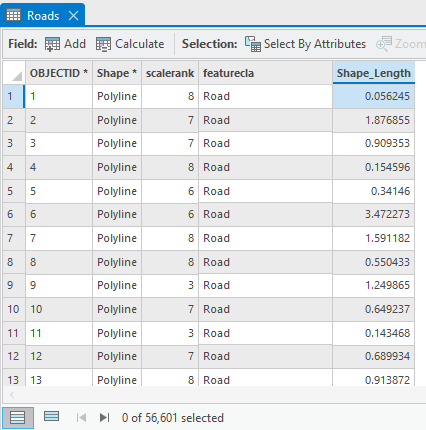
In the output excel file, we will save the complete attribute information to the roads layer. We open the attribute table, and it appears as follows.
1. The first method we will use to make an excel file is TableToExcel.
We add the arcpy module to use the built-in Excel export function TableToExcel_conversion.
Let's set a workspace to the file database from which we will read arcpy.env.workspace.
We name the feature class or table table_name = "Roads".
We set the path to the workspace where we will save the output excel excel_output = r"C:\GISProject\GISBlog\Tools_Projects\GDB_to_Excel\{}.xlsx".format(table_name).We convert the attribute table to excel with arcpy.TableToExcel_conversion(table_name, excel_output).
For TableToExcel_conversion to work we need to pass two parameters, a class or table to be exported and an output path with the name of the new excel file.
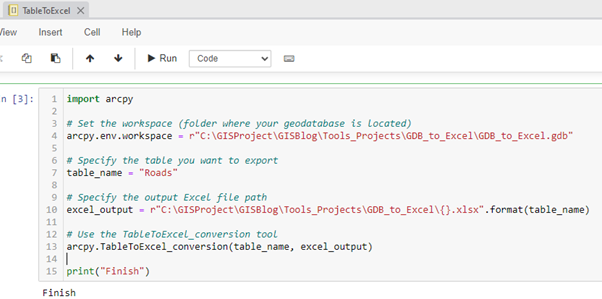
Our excel file is ready let's take a look at it.
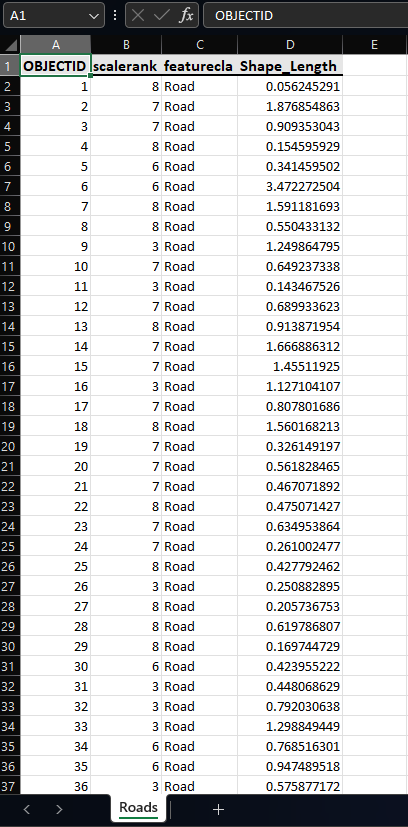
The code we used to export to Excel.
                    import arcpy

                    # Set the workspace (folder where your geodatabase is located)
                    arcpy.env.workspace =
                    r"C:\GISProject\GISBlog\Tools_Projects\GDB_to_Excel\GDB_to_Excel.gdb"

                    # Specify the table you want to export
                    table_name = "Roads"

                    # Specify the output Excel file path
                    excel_output =
                    r"C:\GISProject\GISBlog\Tools_Projects\GDB_to_Excel\{}.xlsx".format(table_name)

                    # Use the TableToExcel_conversion tool
                    arcpy.TableToExcel_conversion(table_name, excel_output)

                    print("Finish")
2. The second way of exporting to Excel is to use the pandas library.
It is part of the built-in Python libraries that comes with ArcGIS Pro.
We import the libraries we will use.
import arcpy
import pandas as pd
Let's set a workspace to the file database from which we will read arcpy.env.workspace.
We name the feature class or table table_name = "Roads".
We read the names of the fields that will be saved in Excel fields = [field.name for field in arcpy.ListFields(table_name)].
We loop through the fields to get their values with data = [row for row in arcpy.da.SearchCursor(table_name, fields)].
We create a data frame in a format read by the pandas library df = pd.DataFrame(data, columns=fields).
We set the path to the workspace where we will save the output excel excel_output = r"C:\GISProject\GISBlog\Tools_Projects\GDB_to_Excel\{}.xlsx".format(table_name).
We save the pandas data frame in an excel file df.to_excel(excel_output, index=False).
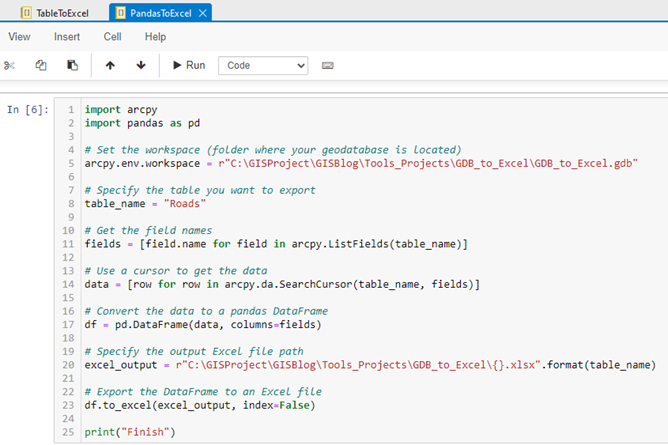
Let's execute the code and examine the results.
We get an Excel file. As you can see the output excel differs from the previous example.
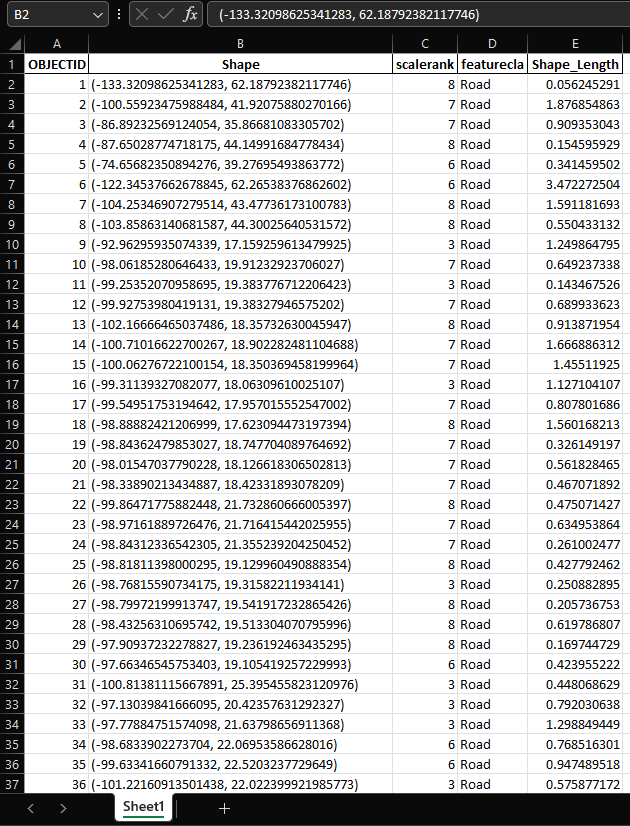
In addition to the main attribute fields, there is also an additional field containing the geometry of the objects.
Since the path class represents linear objects, the result is the center of the path described by coordinates.
Let's take a look at the full code we used to do the export.
                  import arcpy
                  import pandas as pd

                  # Set the workspace (folder where your geodatabase is located)
                  arcpy.env.workspace =
                  r"C:\GISProject\GISBlog\Tools_Projects\GDB_to_Excel\GDB_to_Excel.gdb"

                  # Specify the table you want to export
                  table_name = "Roads"

                  # Get the field names
                  fields = [field.name for field in arcpy.ListFields(table_name)]

                  # Use a cursor to get the data
                  data = [row for row in arcpy.da.SearchCursor(table_name, fields)]

                  # Convert the data to a pandas DataFrame
                  df = pd.DataFrame(data, columns=fields)

                  # Specify the output Excel file path
                  excel_output =
                  r"C:\GISProject\GISBlog\Tools_Projects\GDB_to_Excel\{}.xlsx".format(table_name)

                  # Export the DataFrame to an Excel file
                  df.to_excel(excel_output, index=False)

                  print("Finish")
3. The third way is to use the openpyxl library
This module is part of the standard Python package openpyxl, included with ArcGIS Pro.
The openpyxl module for working with excel files has great possibilities for modifying excel.
Let's add the openpyxl module.
Let's set up a workspace to the geodatabase from which we will export with arcpy.env.workspace.
Let's name the feature class or table with table_name = "Roads".
Let's get the names of all the fields fields = [field.name for field in arcpy.ListFields(table_name)].
Let's loop through the values of these fields data = [row for row in arcpy.da.SearchCursor(table_name, fields)].
Let's create a new excel worksheet and activate it
workbook = Workbook()
sheet = workbook.active.
Let's write the names of the fields in columns:
                   for col_num, field_name in enumerate(fields, 1):
                       sheet.cell(row=1, column=col_num, value=field_name)
, and in the rows the corresponding values
                       for row_num, row_data in enumerate(data, 2):
                         for col_num, value in enumerate(row_data, 1):
                             formatted_value = str(value) if isinstance(value, tuple) else value
                             sheet.cell(row=row_num, column=col_num, value=formatted_value).
Let's save the path to the workspace excel_output = r"C:\GISProject\GISBlog\Tools_Projects\GDB_to_Excel\{}.xlsx".format(table_name).
Let's save the changes in the Excel file workbook.save(excel_output).
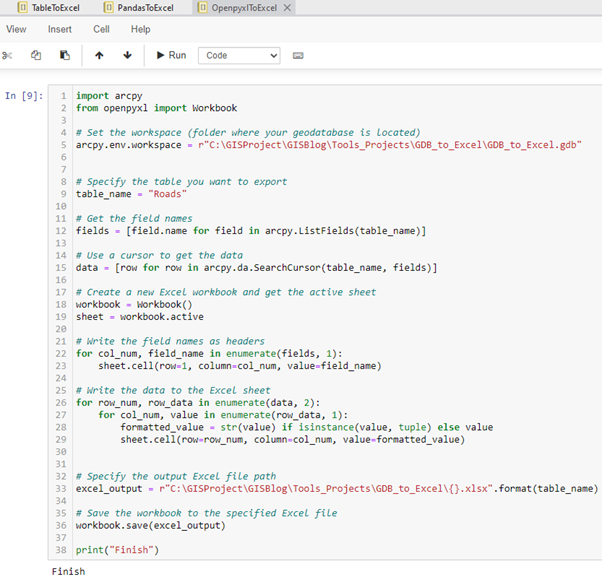
The output in excel looks the same as with the pandas module. Here again names information about the geometry stored by coordinates in the Shape fields.
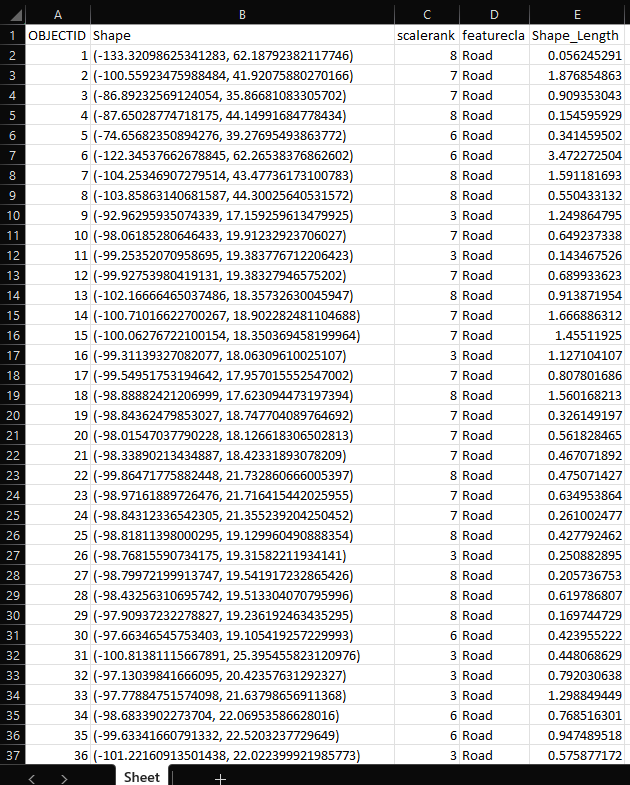
And the full code we used.
                  import arcpy
                  from openpyxl import Workbook

                  # Set the workspace (folder where your geodatabase is located)
                  arcpy.env.workspace =
                  r"C:\GISProject\GISBlog\Tools_Projects\GDB_to_Excel\GDB_to_Excel.gdb"


                  # Specify the table you want to export
                  table_name = "Roads"

                  # Get the field names
                  fields = [field.name for field in arcpy.ListFields(table_name)]

                  # Use a cursor to get the data
                  data = [row for row in arcpy.da.SearchCursor(table_name, fields)]

                  # Create a new Excel workbook and get the active sheet
                  workbook = Workbook()
                  sheet = workbook.active

                  # Write the field names as headers
                  for col_num, field_name in enumerate(fields, 1):
                      sheet.cell(row=1, column=col_num, value=field_name)

                  # Write the data to the Excel sheet
                  for row_num, row_data in enumerate(data, 2):
                      for col_num, value in enumerate(row_data, 1):
                          formatted_value = str(value) if isinstance(value, tuple) else value
                          sheet.cell(row=row_num, column=col_num, value=formatted_value)


                  # Specify the output Excel file path
                  excel_output =
                  r"C:\GISProject\GISBlog\Tools_Projects\GDB_to_Excel\{}.xlsx".format(table_name)

                  # Save the workbook to the specified Excel file
                  workbook.save(excel_output)
                  print("Finish")
Conclusions
The choice between pandas and openpyxl depends on the specific requirements of your task.
If your goal is primarily data manipulation, analysis, and you are dealing with large datasets, pandas is often the preferred choice.
If you need to focus on Excel file I/O and formatting within an ArcGIS environment or for simpler tasks, openpyxl may be more suitable.
In some cases, you may even use both libraries together for their respective strengths.
| Criteria | pandas | openpyxl |
|---|---|---|
| Ease of Use | Pros: Pandas provides a high-level interface, making it easy to manipulate and analyze data. It's especially powerful for data manipulation and analysis. Cons: Learning curve for users unfamiliar with pandas. |
Pros: Openpyxl is simple and easy to use for basic Excel tasks like reading, writing, and formatting. Cons: Limited functionality compared to pandas for complex data manipulation. |
| Performance | Pros: Pandas is optimized for performance and is highly efficient for large datasets. It performs operations in-memory, which can be faster for certain tasks. | Pros: Openpyxl is lightweight, making it suitable for small to medium-sized datasets. It may be less memory-intensive for smaller tasks. Cons: May be slower for large datasets or complex data manipulations. |
| Data Manipulation | Pros: Pandas offers extensive tools for data manipulation, filtering, grouping, and analysis. It provides a DataFrame structure that simplifies working with tabular data. | Pros: Openpyxl focuses on Excel file I/O and formatting. It's not as feature-rich for data manipulation as pandas. |
| Excel Formatting | Pros: Pandas has limited support for Excel formatting. It may require additional workarounds for advanced Excel formatting features. | Pros: Openpyxl provides better support for Excel formatting. You have more control over cell styles, fonts, colors, and other formatting options. |
| Integration with ArcGIS | Pros: Pandas can be integrated with ArcGIS using the arcpy library, allowing seamless data transfer between ArcGIS and pandas DataFrames. | Pros: Openpyxl can also be integrated with ArcGIS using arcpy. It is suitable for straightforward Excel tasks within an ArcGIS environment. |
| File Size and Compatibility | Pros: Pandas supports multiple file formats beyond Excel (CSV, HDF5, SQL, etc.). It is versatile for different data storage needs. | Pros: Openpyxl primarily focuses on Excel files. It may be more suitable if Excel is the primary file format for your workflow. |
| Licensing | Pros: Pandas is open-source and free to use. | Pros: Openpyxl is open-source and free to use. |
Thank you for your attention.
In future posts, we will explore how to use Python to check for classes, fields, and values in a file database.
Please consider subscribing to our newsletter.